In theory an object that has a compressive force directly in the axial direction, and is a homogeneous material should not buckle unless a small lateral force is place on it. However, in real life columns still buckle even if we believe the above are implemented. The reason for this is because materials are not perfectly homogeneous, and it is highly unlikely a perfect axial force is place on the part.
Basically, buckling occurs in a column due to an instability. This means that a column does not always buckle at the force that will correspond to the yield stress. Instead it will buckle at what is called the buckling force. To view this in real life, take a credit card or something similar and slowly apply a compressive force to it. You will notice at a certain force it will start to buckle.
Buckling is more pronounced in long narrow columns then in short thick columns. Also, depending on the materials used and how brittle they are, yielding or rupture may occur when buckling occurs. While in other cases, particularly long narrow column the structure will return to its original condition once the load is released.
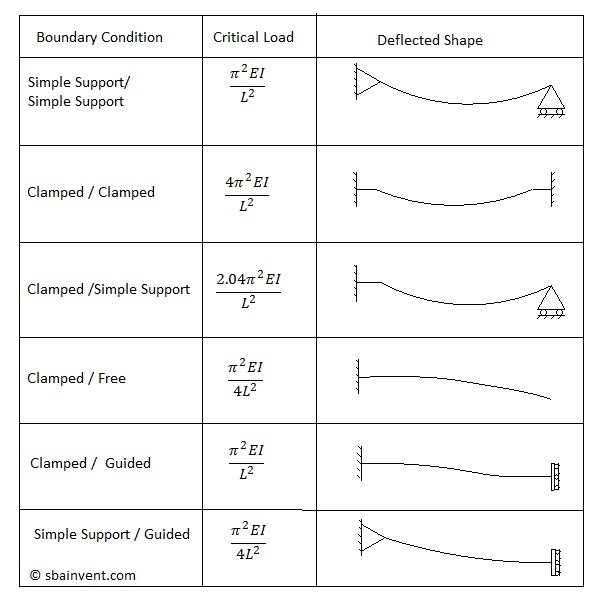
The following table provides the equation to calculate buckling force for certain conditions.
(Eq 1) $σ_{cr} = \frac{P_{cr}}{A}$
How to Derive a Critical Loading Equation
This section describes how to calculate the critical loading equation for the simple support / simple support boundary condition. This is high level math, but if you know how to calculate differential equations you should understand this.
The first step would be to derive a free body diagram which can be seen below.
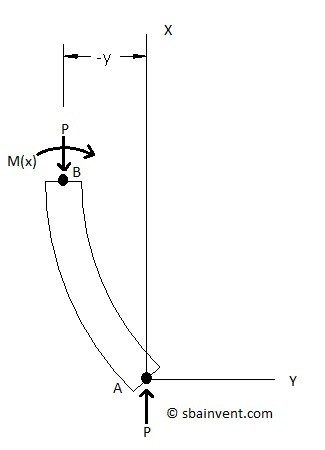
(Eq 2) $M(x) = -Py$
The radius of curvature due to the buckling needs to be considered also. Refer to equations 3 and 4.
(Eq 3) $M(x) = \frac{EI}{R(x)}$
(Eq 4) $\frac{1}{R} = \pm\frac{\frac{d^2y}{dx^2} }{\left[1+\left(\frac{dy}{dx}\right)^2\right]^{3/2}}=\pm\frac{d^2y}{dx^2}$
Combining equation 3 and 4 will result in equation 5.
(Eq 5) $M(x)=\pm{}EI\frac{d^2y}{dx^2}$
Combine equations 5 and 2 will result in equation 6.
(Eq 6) $\frac{d^2y}{dx^2}+k^2y=0~where~k^2=\frac{P}{EI}$
Notice that equation 6 is a second order differential equation. After applying the boundary conditions the critical load and the equation that represents the shape of the column due to buckling can be solved for.
The boundary conditions for a simple support / simple support are: y=0 for x=0 & x=L
The general solution of equation 6 can be seen in equation 7.
(Eq 7) $y=A·\sin(kx)+B·cos(kx)$
Using the boundary condition the constants A and B in equation 7 can be solved for. Refer to equation 8.
(Eq 8) $A·\sin(kL)=0,~B=0$
From equation 8 we know that the constant B goes to zero. However, the first part of that equation we have two constants that aren’t known (A and k). It will be trivial to make A go to zero so instead k will have to make the equation go to zero; refer to equation 9. Note we already have one value for k from equation 6.
(Eq 9) $k=sqrt{\frac{P}{EI}}=\frac{nπ}{L},~n=1,2,3,…$
Solving Equation 9 for P will result in the equation that describes that critical load. Refer to equation 10.
(Eq 10) $P_{cr} = \frac{n^2π^2EI}{L^2},~n=1,2,3,…$
To describe the shape equation 11 would be used.
(Eq 11) $y=A_n·\sin\left(\frac{nπx}{L}\right),~n=1,2,3,…$
A n would have to be determined by using the theory of elastica.
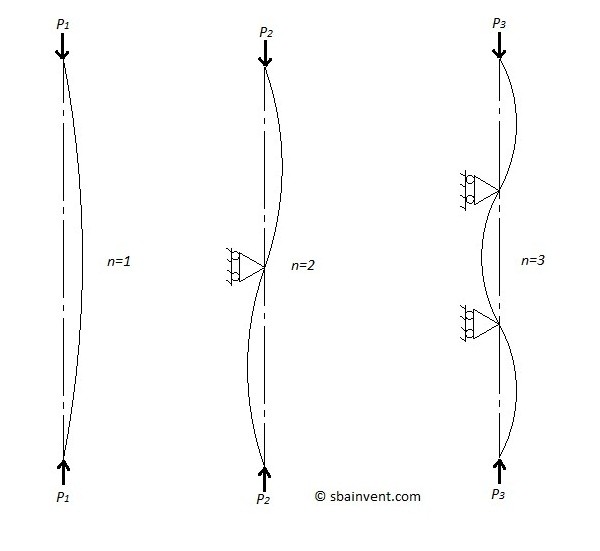
Higher Order Buckling
In equation 10 you may have noticed a constant n, this represents the higher buckling modes. Basically if n is greater than one a higher buckling mode is being described. Refer to the figure below to view higher buckling modes.